Containerize Java Application & Deploying on AWS Elastic Beanstalk
What is Containerizing(Dockerizing)?
Containerizing/Dockerizing is the process of deploying applications in a docker container. Docker containers are lightweight, less memory consuming containers. It has access to the hosting kernel without carrying a operating system in it. Some of the advantages are,
- Gives portability. (mirroring the application)
- Application can be tested in a pre-production state.(Before deploying it on the actual production server we can run it through every situation which is going to be there in the actual environment)
This post will give the basic idea of dockerizing and deployment using AWS elastic beanstalk.
Prerequisites
- Sample Java Play Application
- Install Docker locally on workstation
- AWS account and Elastic Beanstalk service
Sample Java Play Application
- Download a sample Java Play Application from this link
- Run the project and check for any configuration errors, etc and resolve them if there is anything. Basically the application will run on http://localhost:9000/ by default.(Change the port according to what you prefer)
Install Docker Locally
When downloading docker, you can try out the community stable version of it for this tutorial.
Mac OS installation (Tutorial is based on mac os)
- You can find the link which will provide you a Docker.dmg file which can be installed on Mac OS. https://docs.docker.com/docker-for-mac/install/#download-docker-for-mac
- After installing the .dmg file on Mac OS you can find the Docker Whale on launchpad. When you launch it, the docker whale icon will be displayed on the top status bar and you can see that the docker is running on your workstation.
- To verify that the docker is running successfully on your Mac you can try out the below command on terminal and you will get the docker version if it is installed successfully.
docker --version
Linux Installation
AWS account and Elastic Beanstalk services
- Create an account in AWS
- After that proceed to Elastic Beanstalk service https://ap-south-1.console.aws.amazon.com/elasticbeanstalk/home?region=ap-south-1#/applications. In there you can create an application and an environment to deploy your application.

- Next, select the environment(For this tutorial we have selected Web Server Environment).

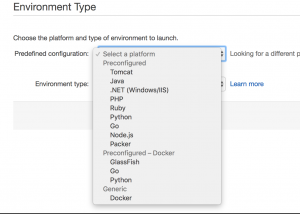
- Now it’s time to select the Environment type. (Select Docker under generic category)
- After that proceed the environment creation with default configurations.
Getting Started
Creating a Docker Image
Next will move on to creating an image using docker locally.
First go to your play application root directory and execute the below command to generate the Dockerfile.sbt docker:publishLocal
You can see that it creates a docker directory in target/ path.

Inside target/docker/stage/ it will create the following Dockerfile and opt/ directory and that is where we can build the docker image.

Now you are good to build the docker image locally by using the below command. (you should be in the target/docker/stage/ directory)
docker build -t sample-play-docker-image .
After you create the docker image successfully you can verify that by using the following command.
docker images | grep sample-play-docker-image
Then you are about to run and test your docker image locally. (I will use port as 9000 since EXPOSE in Dockerfile is 9000)
This docker image can run in normal way as well as a background task.
docker run -p 9000:9000 sample-play-docker-image
docker run -p 9000:9000 -d sample-play-docker-image
If you run it as in the first command it will start the execution and you can see that on terminal. But if you run it using the second command it will just give you an id only.
To check whether the background task has successfully done you can try the following command.
docker ps
docker ps -a
From the above two commands it will give you the status of currently running docker images and status of all the docker images accordingly.
Furthermore docker commands are as follows,
docker stop <container id> # stop a running docker instance
docker start <container id> # start an existing docker instance
docker rm <container id> # remove a docker container
docker rmi <image id> # remove an image from local docker
Deployment On AWS Elastic Beanstalk
Now it’s time to deploy our docker image on AWS Elastic Beanstalk.
Zip your docker content which is inside /target/docker/stage/ as bellow,
$ sample-play-application/target/docker/stage
zip -r ../sampleplayapplication.zip .
This will create sampleplayapplication.zip file in target/docker/ directory.
After that you can upload that generated zip file to Elastic Beanstalk service under your environment. The uploading process will get a little bit of time and after several minutes your application will be successfully deployed on Elastic Beanstalk and you can access your application using the given URL. (example : sampleplayapplication.ap-south-1.elasticbeanstalk.com)


Comments
Post a Comment